These delightful Christmas Tree Cookies bring festive cheer to your holiday celebrations. Soft, buttery, and decorated with vibrant colors, they are a joy to make and even more fun to eat. Whether you’re baking with family or preparing treats for a gathering, these cookies are sure to spread holiday magic.
Ingredients
- 2 ¾ cups all-purpose flour
- 1 teaspoon baking powder
- ½ teaspoon baking soda
- ½ teaspoon salt
- 1 cup unsalted butter, softened
- 1 cup granulated sugar
- 1 large egg
- 1 teaspoon vanilla extract
- ¼ teaspoon almond extract (optional)
- 3-4 tablespoons milk
- Green food coloring
- Mini M&Ms, sprinkles, or sugar pearls for decoration
- Powdered sugar for dusting
Directions
- Preheat the oven to 350°F (175°C). Line baking sheets with parchment paper.
- In a medium bowl, whisk together flour, baking powder, baking soda, and salt. Set aside.
- In a large bowl, beat softened butter and sugar until light and fluffy. Add the egg, vanilla extract, and almond extract (if using), and mix well.
- Gradually add dry ingredients to the butter mixture, mixing until combined.
- Add milk, 1 tablespoon at a time, until the dough is soft but not sticky. Add green food coloring until the desired shade of green is achieved.
- Roll out the dough on a floured surface to ¼-inch thickness. Use a Christmas tree-shaped cookie cutter to cut out cookies and transfer them to the prepared baking sheets.
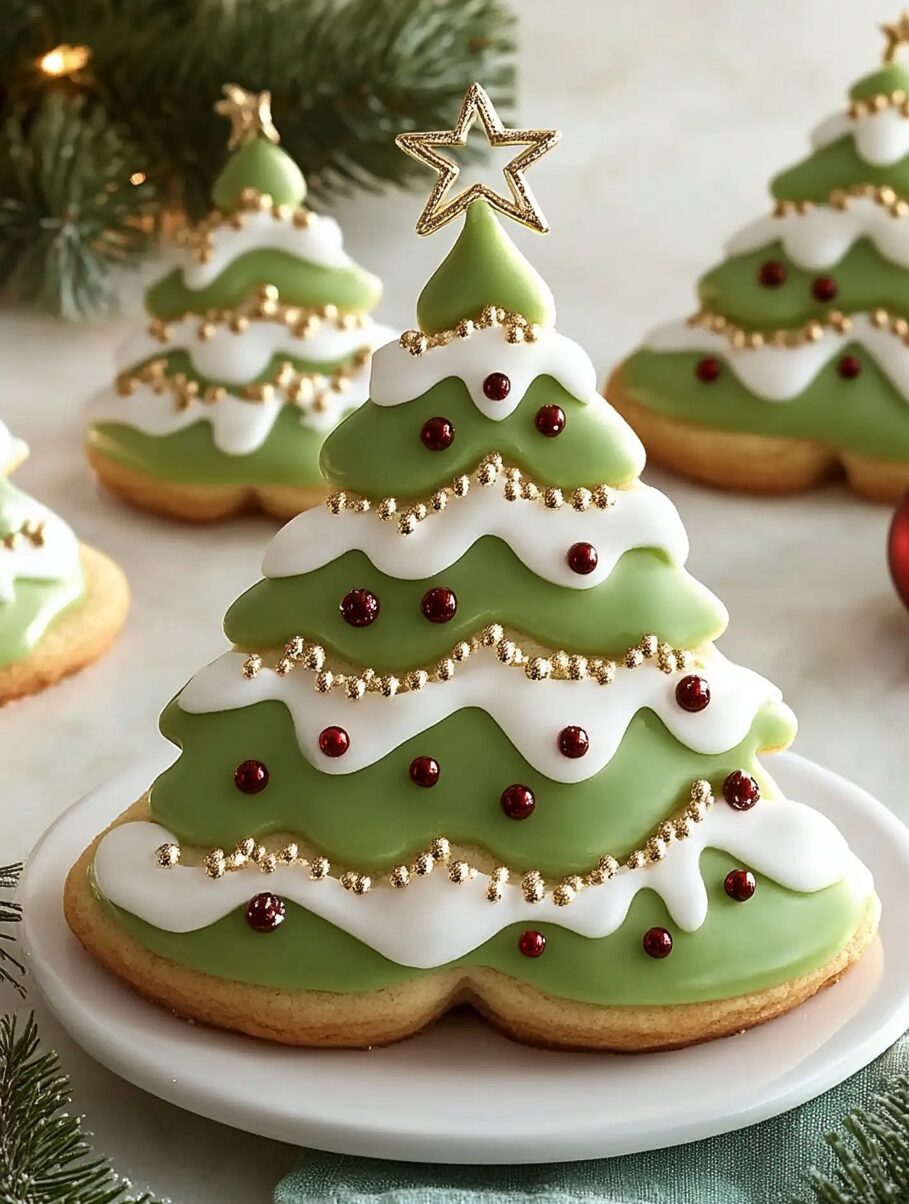
- Decorate with mini M&Ms, sprinkles, or sugar pearls as ornaments on the trees.
- Bake for 8-10 minutes, until edges are lightly golden. Let cookies cool on the baking sheet for 5 minutes, then transfer to a wire rack to cool completely.
- Once cooled, dust the tops with powdered sugar for a snowy effect.
Nutrients
- Calories: ~150 kcal per cookie
- Servings: Approximately 24 cookies
Enjoy crafting and sharing these festive treats that perfectly capture the spirit of the holidays!

Christmas Tree Cookies: A Festive Delight for the Holiday Season
The holiday season is a time for warmth, joy, and traditions, and few traditions are as universally cherished as holiday baking. Among the numerous treats that find their way onto our festive tables, Christmas Tree Cookies stand out as a symbol of creativity, togetherness, and, of course, delicious indulgence. These soft, buttery, and beautifully decorated cookies are more than just a dessert; they’re an experience that brings people together. Whether you’re hosting a holiday party, looking for a fun activity with the kids, or simply indulging in some seasonal self-care, these cookies are an excellent choice.
The Appeal of Christmas Tree Cookies
What makes Christmas Tree Cookies so beloved? For starters, they encapsulate the holiday spirit with their whimsical design and vibrant colors. The bright green of the trees, adorned with miniature “ornaments” like M&Ms or sprinkles, mirrors the festive decorations we associate with Christmas. The powdered sugar dusting evokes a snowy winter wonderland, adding a touch of magic to each bite.
Moreover, these cookies are as much about the process as the final product. From mixing the dough to selecting decorations, every step invites creativity and personalization. Families often find that baking these cookies together becomes a cherished tradition, with each member contributing their flair. Whether you stick to classic decorations or go for modern twists with edible glitter or unique toppings, the possibilities are endless.
The Science Behind the Perfect Cookie
While the charm of Christmas Tree Cookies lies in their appearance, their delightful taste and texture are the result of precise baking science. Achieving the soft, buttery consistency involves balancing fats, sugars, and leavening agents. The butter provides richness and tenderness, while the sugar caramelizes during baking to create a subtle sweetness.
The baking powder and baking soda play crucial roles in achieving the cookies’ ideal texture. Baking powder ensures a uniform rise, while baking soda reacts with acidic components in the dough (such as the optional almond extract) to create a slightly crisp exterior. Together, these ingredients produce cookies that are soft on the inside with just the right amount of structure to hold their shape.
Adding milk to the dough is another key step. This liquid component helps to bind the ingredients, ensuring a cohesive texture while also adding moisture. The amount of milk added can vary depending on the humidity of your kitchen or the type of flour used, so the dough’s feel becomes the ultimate guide. It should be soft and pliable but not sticky.
Decorating as an Art Form
The fun truly begins once the cookies are baked and cooled. Decorating Christmas Tree Cookies offers an outlet for artistic expression and allows bakers of all ages to get involved. Traditional decorations often include green frosting or food coloring to create the tree’s base color, while sprinkles, mini candies, and sugar pearls serve as ornaments.
Modern trends in cookie decoration have introduced edible metallic paints, natural food colorings, and even themed designs that step beyond the traditional green tree. Some bakers prefer a minimalist approach, using white icing to simulate snow-laden branches, while others go all out with intricate patterns and vibrant details.
For those looking to elevate their cookie game, royal icing can be used for precise designs. This icing dries to a smooth, hard finish, making it perfect for intricate patterns. Alternatively, a simple glaze made from powdered sugar and milk can be brushed over the cookies for a shiny effect.
Sharing and Storing the Magic
One of the joys of baking Christmas Tree Cookies is sharing them with loved ones. These cookies make excellent gifts, especially when packaged in festive tins or wrapped in clear cellophane with a holiday ribbon. They also work well as part of a dessert spread during gatherings or as a thoughtful contribution to cookie exchanges.
When it comes to storage, these cookies hold up well for several days in an airtight container, making them a convenient option for advanced holiday prep. If you’re planning to bake a large batch, the dough can also be made ahead of time and refrigerated for up to two days. Freezing is another option, allowing you to prepare the dough weeks in advance and bake fresh cookies as needed.
The Joy of Baking Together
The process of making Christmas Tree Cookies is as rewarding as the final product. For families, it becomes an opportunity to create memories and bond over shared tasks. Kids especially love cutting out the shapes and decorating the cookies, turning the kitchen into a lively workshop of creativity and laughter.
For those who enjoy baking solo, the act of creating these cookies can be meditative and fulfilling. The repetitive motions of rolling, cutting, and decorating provide a sense of accomplishment and calm, while the delightful aroma of freshly baked cookies fills the home with holiday warmth.
Variations to Try
While the classic Christmas Tree Cookie recipe is a favorite, there are countless ways to adapt it to suit different tastes and preferences:
- Flavor Variations: Add spices like cinnamon, nutmeg, or cardamom for a warming touch. Alternatively, try substituting lemon or orange zest for a citrusy twist.
- Gluten-Free Options: Substitute the all-purpose flour with a gluten-free baking mix to accommodate dietary restrictions without compromising on taste or texture.
- Vegan Adaptations: Replace butter with vegan butter and use a flaxseed egg (1 tablespoon ground flaxseed mixed with 3 tablespoons water) as a substitute for the egg.
- Chocolate Lovers’ Version: Add cocoa powder to the dough for a rich, chocolate-flavored base. White chocolate chips can serve as decorations for a snowy look.
- Nutty Appeal: Incorporate finely chopped nuts like pecans or pistachios into the dough for added texture and flavor.
Conclusion
Christmas Tree Cookies are more than just a holiday treat—they’re a tradition, a creative outlet, and a way to spread joy. Their delightful appearance, coupled with their buttery softness and rich flavor, makes them a staple in many households during the holiday season. Whether you’re an experienced baker or a novice looking for a festive project, these cookies are a fantastic choice. They invite you to experiment with flavors and decorations, share your creations with loved ones, and revel in the festive spirit.
As you enjoy the process of baking and sharing these cookies, remember that the true essence of the holiday season lies in the moments spent together. So gather your family, grab some cookie cutters, and let the magic of Christmas Tree Cookies fill your home with love and laughter.